In today’s fast-paced digital environment, manual document creation is a significant bottleneck. Repetitive tasks like generating invoices, creating reports, or personalizing contracts consume valuable time and are prone to human error. What if you could automate this entire process, ensuring speed, accuracy, and consistency every time?
This technical guide will show you how to connect PDF Generator API, a robust tool for dynamic PDF generation, with n8n, a flexible workflow automation platform. By the end of this tutorial, you will be able to build a seamless workflow that automatically generates custom PDF documents based on your data.
This post is for you if:
- You’re a developer or CTO looking for a scalable and reliable way to integrate PDF generation into your application stack.
- You’re a Product Manager aiming to improve product features by automating document delivery.
- You’re a CEO or business owner focused on boosting operational efficiency and reducing manual overhead.
What is n8n?
n8n is a fair-code licensed, extendable workflow automation tool. It allows you to connect any app with an API to create and automate complex workflows with very little code. With its intuitive visual, node-based editor, you can map out processes, connect services like your CRM or database, and let the automation handle the work. Whether you use the cloud version or self-host for maximum control, n8n is a powerful engine for systems integration and process automation.
Why Integrate PDF Generator API with n8n?
While n8n provides the automation framework, PDF Generator API provides the specialized functionality for creating high-quality, data-driven PDF documents. Our service allows you to design PDF templates with our intuitive drag-and-drop editor and then merge them with JSON data via a simple API call.
The benefits of this integration include:
- Unmatched Efficiency: Automate the creation of thousands of documents—from invoices and shipping labels to personalized certificates and healthcare records—without any manual intervention.
- Deep Customization: Dynamically populate templates with data from any source connected to your n8n workflow, ensuring each document is perfectly tailored.
- Scalability and Reliability: Build robust, enterprise-grade document generation workflows that scale with your business needs.
- Reduced Errors: Eliminate the typos, formatting issues, and data entry mistakes that come with manual document creation.

Step-by-Step Guide: Generating a PDF with n8n
Let’s dive into the practical steps of setting up a workflow in n8n to generate a PDF using PDF Generator API.
Prerequisites
- An n8n Account: You’ll need an active n8n instance. You can sign up for n8n.cloud or set up a self-hosted version.
- A PDF Generator API Account: If you don’t have one, sign up for a free account. You get a free trial with credits to test the full functionality.
- A PDF Template: Create a PDF template in your PDF Generator API account. For this guide, we’ll use a simple template that accepts a “name” and “company” field.
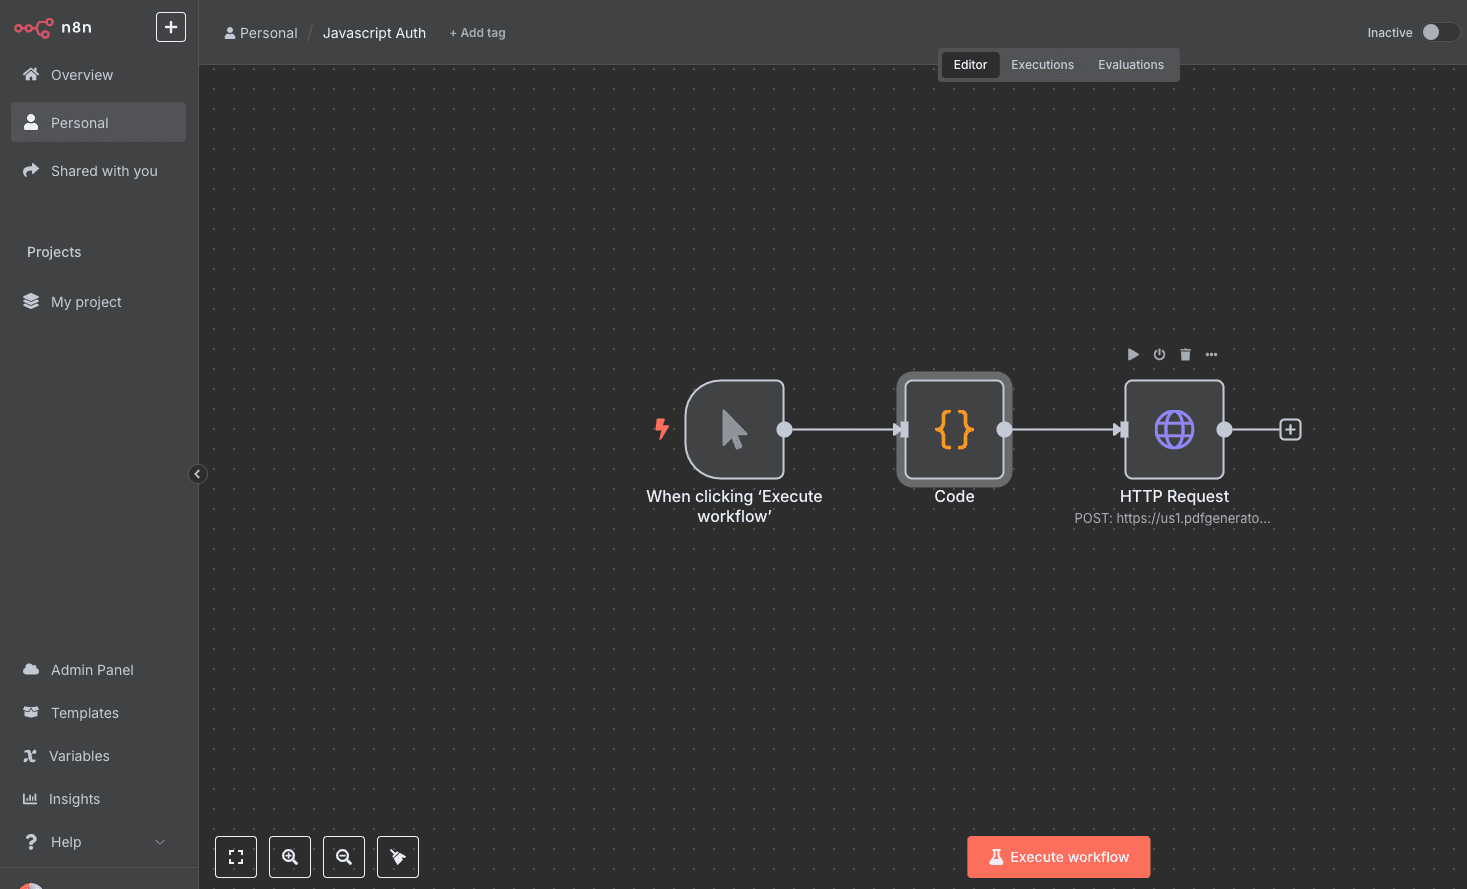
Step 1: Code Node (Generating a JWT with JavaScript)
Our first node in this n8n workflow will be dedicated to generating this required token. We’ll use the versatile Code node to run a small JavaScript snippet that creates the JWT for us.
- On the n8n canvas, click the `+` icon to add the first node to your workflow.
- In the “Search nodes…” dialog, type Code and select the Code node from the list. This node is incredibly powerful as it lets you run custom JavaScript or Python code at any point in your workflow.
- With the Code node selected, ensure the Language parameter is set to JavaScript.
- Next, copy the complete JavaScript snippet for generating the JWT and paste it into the JavaScript Code editor panel.
- (Paste your JavaScript snippet here in your article)
- The provided script is designed to perform the authentication logic and, most importantly, to return a JSON object. In n8n, the data returned by a node becomes its output, which can then be used as input by all subsequent nodes. In this case, the code will output an object containing our newly created token.

To confirm everything is working correctly, click the Execute Node button at the bottom of the parameters panel. You should see a successful run and, in the Output tab on the right, a JSON object containing a jwt_token property.
Code Sample for JSON Web Token (JWT) Generation in JavaScript
const crypto = require('crypto');const apiKey = 'REPLCE_WITH_YOUR_API_KEY';const apiSecret = 'REPLCE_WITH_YOUR_SECRET';const workspace = 'REPLCE_WITH_YOUR_WORKSPACE_IDENTIFIER';

// 1. Create the JWT Header and Payloadconst header = {  alg: 'HS256',  typ: 'JWT'};
const payload = {  iss: apiKey,  sub: workspace,  exp: Math.floor(Date.now() / 1000) + (1 * 60) // Token expires in 60 second};
// Helper function to Base64Url encode dataconst base64UrlEncode = (data) => {  return Buffer.from(JSON.stringify(data))    .toString('base64')    .replace(/=/g, '')    .replace(/\+/g, '-')    .replace(/\//g, '_');};
const encodedHeader = base64UrlEncode(header);const encodedPayload = base64UrlEncode(payload);
// 2. Create the signature using the correct crypto function// This is what the Crypto node was failing to do.const signatureInput = `${encodedHeader}.${encodedPayload}`;
// The 'crypto' module is globally available in n8n Function nodesconst signature = crypto  .createHmac('sha256', apiSecret)  .update(signatureInput)  .digest('base64')  .replace(/=/g, '')  .replace(/\+/g, '-')  .replace(/\//g, '_');
// 3. Combine the parts into the final JWTconst finalJwt = `${signatureInput}.${signature}`;
// 4. Return the result for the next n8n node to usereturn [{  json: {    jwt: finalJwt  }}];
Security Warning: Hardcoding API credentials directly in the code, as done here for illustrative purposes, creates a significant security vulnerability. In production, always store credentials securely.
Step 2: Making the HTTP Request to Generate the PDF
Now that our workflow can generate an authentication token, we need to use it to make a successful API call. This is where the HTTP Request node comes in. We will configure this node to send our document data and our JWT to the PDF Generator API, which will then return the finished PDF file.
- Click the `+` icon on the Code node you just created to add the second step to the workflow.
- Search for and select the HTTP Request node.
- Now, we need to configure the node’s parameters:
- Method: Set this to POST, as we are sending data to the API to create a new resource (our PDF).
- URL: Paste the API endpoint for the PDF Generator API’s document generation service. https://us1.pdfgeneratorapi.com/api/v4/documents/generate
- Next, we’ll handle authentication. This is the most critical step.
- Under the Authentication dropdown, select None.
- Switch the Send Headers toggle.
- In the Name field, enter Authorization. This is the standard header for sending authentication credentials.
- In the Value field, we need to dynamically insert the token from our first node.
- Click the “Expressions” icon (</>).
- In the expression editor, type Bearer (with a space at the end).
- After the space, drag the jwt_token value from the Input Data > JSON section on the left. This links the output of the first node to the input of the second.
- The final expression should look like this: Bearer {{$json[“jwt_token”]}}
- This tells n8n to construct an Authorization header with the word “Bearer” followed by the token generated in the Previous Step.
The Content-Type: application/json header is included to inform the API that the data we are sending in the request’s body is structured in JSON format, ensuring the server can correctly interpret it.

Step 3: Specify the document we want to create.
At the bottom of the node, click on the Body tab. Set the Body Content Type to JSON. In the Body field, paste the JSON payload that defines your document. This includes the template ID and the data you want to merge.

Example JSON payload
{ "template": { "id": "REPLACE_WITH_TEMPLATE_ID", "data": { "id": 123, "name": "John Smith", "birthdate": "2000-01-01", "role": "Developer" } }, "format": "pdf", "output": "url", "name": "My First Document from PDFGeneratorAPI", "testing": false}The current implementation uses a static JSON payload for demonstration purposes. In a production environment, this will be replaced with a dynamic data object populated by values from earlier steps in the automation.
Step 4: Executing the Workflow and Viewing Your PDF
With both the Code node and the HTTP Request node fully configured, your automated document generation workflow is now complete. It’s time to run the entire process from start to finish and view the generated document.
Click the Execute Workflow button located in the bottom-centre of the n8n canvas.
You will see n8n execute each node in sequence. First, the Code node will run, generating the JWT. Then, the HTTP Request node will take that token and the JSON data, make the POST request to the PDF Generator API, and receive a response. If everything was configured correctly, both nodes will have a green border, indicating a successful run.
By using the output=url parameter, the HTTP request prompts the API to respond with a public URL instead of the raw file data. This URL can be opened directly in your browser to view the generated document.

Unlock Your Automation Potential: Real-World Use Cases
The simple workflow we built is just the beginning. Here’s how you can apply this integration to solve real business challenges:
- Automated Invoicing: Trigger a workflow whenever a new order is placed in your Shopify, WooCommerce, or Stripe account. n8n can pull the customer and order details, pass them to PDF Generator API to create a professional invoice, and email it directly to the customer.
- Customized Financial and Legal Documents: Connect to your internal database or a Google Sheet. When a new entry is added, automatically generate a personalized contract, proposal, or financial report and save it to a secure cloud folder.
- Scalable Healthcare Reporting: For organizations in the healthcare sector, this integration can automate the generation of patient summaries, lab reports, and discharge forms from Electronic Health Record (EHR) systems, ensuring compliance and consistency.
- Personalized Marketing and Sales Collateral: When a new lead fills out a form on your website (e.g., a Typeform or Webflow form), trigger a workflow to generate a personalized welcome letter, a custom quote, or a product brochure and send it to your sales team via Slack.
Start Automating Your PDF Generation Today
By combining the workflow automation power of n8n with the dynamic document generation capabilities of PDF Generator API, you can reclaim countless hours, eliminate manual errors, and build incredibly efficient systems.
Ready to take control of your document workflows?
